Table of Contents
Introduction
We're going to have a look at a light and simple way to make a curve dynamic in Maya. This technique doesn't seem very used, especially because the hairSystem - now known as nHairSystem - can make a curve dynamic in a very faster way (this tutorial will come soon =)).
The main stake, from my point of view, is the lightness of this technique, this can save some
rigs =) !
So now, let's get straight to the point !
Application
Setting our workspace
What are you going to need ? Nothing more than few curves =), we're going to use two curves ;
the first one will be our guide
the second one will try to follow the first one dynamically
Let's create a simple curve like that:

Personnaly I've decided to work with a cubic curve with 6 controlVertices, snapped on my grid, of course you can do the shape you want, if you want the exact same curve as in this example, run this line of code in a Python script ;
import maya.cmds as cmds
cmds.curve(
	p=[[0,i,0] for i in range(6)],
	k=[0,0,0,1,2,3,3,3],
	d=3,
	name='cv_guide')
This curve will be our guide, so let's name it cv_guide

Adding dynamic
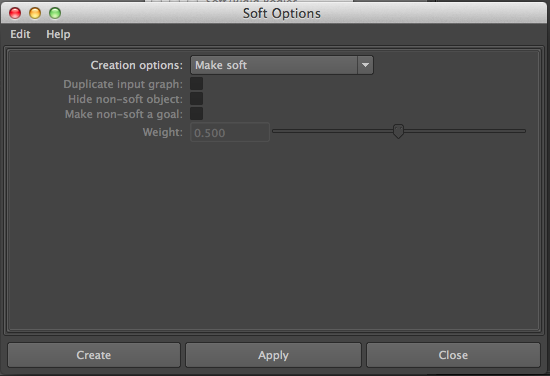
Now we need to make this curve dynamic. To do so, we need to select our curve named cv_guide, then go in the menu Soft/Rigid Bodies if you are in the 'Dynamics' workspace, otherwise by pressing Space → Soft/Rigid Bodies, what we're looking for in this menu is the tool Create Soft Body, let's go in the options =) !
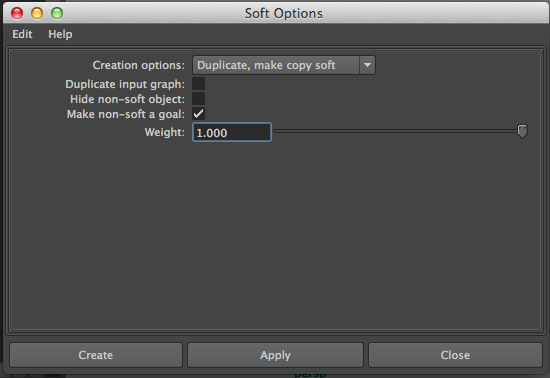
This is what you should see, if you click on the Creation options, you see there is two other options available, the one we need here is Duplicate, make copy soft !

Indeed, we've named our first curve cv_guide, so this is gonna be our guide, and this
one, the duplicate will be soft, dynamic. Of course, once you selected this option, check the Make
non-soft a goal box below, since this is exactly what we want. Finally you can set the
weight to 1.
We're not going to detail all the other options, they are quite obvious, but well, if ever you have
trouble, don't hesitate to ask for help =) !
So now our Create Soft Body window should looks something like ;
We just have to press Create now !
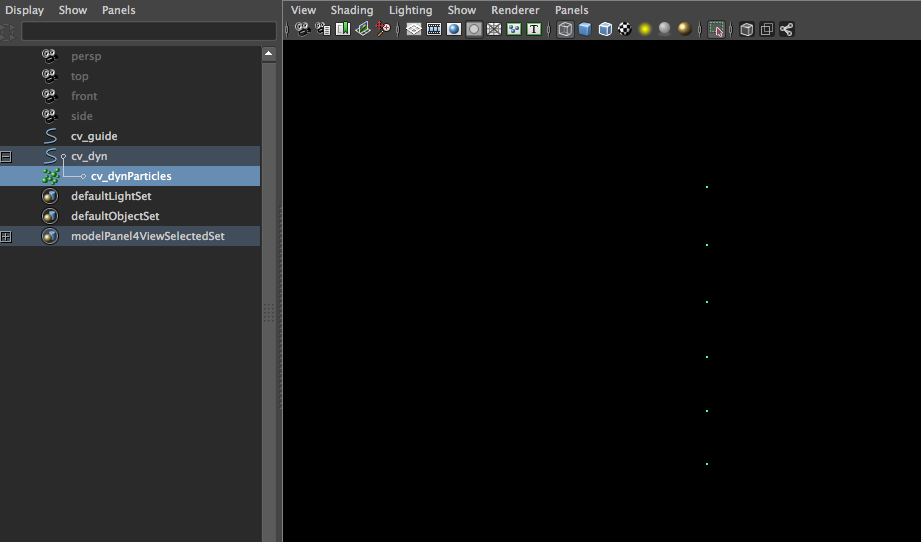
Apparently no change have occured, except that Maya made a duplicate of our curve called copyOfTheNameOfYourCurve, this duplicate seems to have more than one child because we can expand it:

If you unfold the hierarchy of copyOfcv_guide (I renamed it to cv_dyn) you'll see a particle system in it (you should also rename the particle system, let's keep the good habits =))
So what Maya is doing internally, is to set a weight on each of these particles (which match with the CVs of your original curve). If the weight is 1, this means the particle (and so the controlPoint of the cv_dyn) will follow completely the cv_guide, whereas if the weight is 0 the result is opposite ; the curve cv_dyn doesn't follow cv_guide at all.
So now we just have to create an animation on our cv_guide, to make some 'skinning' of our curve cv_dyn, to see the result ! Feel free to create a simple animation as you want. I just set one keyframe at frame 0 with all translate to 0, then an other key at frame 10 in translateX, and a last one at frame 20 with all translates to 0 again.
If you press Play you will see your cv_dyn following the cv_guide, as we wanted (don't forget to set your playback speed on play every frame, max realtime since we are working with particles).
Skinning
Now we're going to add some details on our curve. To do so, I suggest you to isolate your cv_dynParticles, the shortcut is Shift + I
This way you can access easily to your particles. To select them, press RMB above and
choose Particles to go in particles selection mode.
Now you just have to select - for instance - the first particle, then go in the Component
Editor in the Particles tab.
Here you can see the last column of the table is 'goalPP' (i.e. goal perParticle), these
values indicates how much your particle will follow the cv_guide curve.
This is the same principle as for skinning with joints, you just have to set a weight between 0 and
1. Feel free to set these values as you want, this is where our animation we've made is becoming
useful, now we can judge the dynamic !
Ending
Since you're satisfied with your skinning, you can use your new crazy dynamic curve as you
want. For instance, if you skin your cv_guide curve with 3 joints, you can now control the
main curve with these joints, then you attach a chain of joints on your curve cv_dyn with..
let's say, an ikSpline.
You can also combine this dynamic with a "manual" control (for a simple hair rig for instance) with
some plusMinusAverage or multiplyDivide.
Well, now you've got it, feel free to use this technique as you want =) !