Table of Contents
Introduction
Lots of tutorials are available on internet to learn Python. However, tutorials to learn python applied to maya are more rare, and it can be tricky to dive into such a huge field without a real understanding of how this knowledge can be applied to your needs. So in this tutorial, we're going to cover the basics (and I'd like to strongly insist on this: It is really the very basics !), while trying to apply them as soon as possible to Maya. Of course, those of you who're familiar with Python already will not find any benefit in this tuto, and some other might be shocked by some of my explanations that are not perfectly accurate, as my main concern is to keep things simple. For the others, I hope what you'll find here will help you diving into the wonderful world of scripting in maya =)
For the technical aspect, you won't need anything else than a valid install of Maya, at least at first. Later on, if you want to go further, you might want to switch to a text editor at worst (notepad++ on pc, komodo/bbEdit/etc on mac will do the job at first), or better, a proper IDE (Eclipse for instance, but you can also go for Sublime, gvim (the best =p), Atom (by the team behind Git), JEdit, wing, ...) For the needs of this tutorial, we'll stick to Maya's script editor (that you can find under Window>General Editors>Script Editor). You probably already noticed that the upper part of the script editor is a 'listener' (where maya will print out what it's doing). We can say that the communication in this part goes in the direction Maya --> User, while the lower part is for the user (so the communication flow is User --> Maya)
With that said, let's begin !
First part: The basics of Python
Variables
To begin, we need to define some concepts specifics to Python, and by extension to any programming language. One of those fundamentals concept is called Variables. A variable, roughly, is a piece of the memory of your computer in which you can store an information, that you'll read or edit later. For instance, I can create a variable named 'box' by writing in my script editor:
box = 10
If I run this line (select it, then press ctrl + Return. Selecting the line before prevents you from removing the line when you execute the code), I'll store, somewhere in the memory of my computer, the value 10, that I'll be able to call later, every time I'll ask the computer to give me the content of this part of the memory, the content of my box. Therefore, if I ask maya to 'print' the content of my variable (with the function 'print'), and run it:
"print box
I get bach the value of my box, 10, in the upper part (the listener)

Note the use of the command « print », definetly one of the most useful commands in python ! This command lets you print anything and everything, from the content of a variable (just like we did here) to the length of a word... The syntax is super simple, it's 'print', followed by what you want to print =)
It is crucial to understand that when Python reads a line containing a variable, it will replace this variable by what's in it.
For example, after I created my "box" variable, I can write "box + 5", and python will return me "15". The word "box" has been replaced by its value. And here is the strength of the variables !
The other thing to know with variables is that they can be of different types, and each type has very different properties ! Before describing them, I'd like to highlight the fact that as soon as you define a variable, you define its type as well. Python has what is called a dynamic-typing system (opposed to static-typing system, for python or c++, among others), which means that every time you create a variable (or you "declare" a variable), Python will understand directly of which type your variable is. In mel, for example, you have to declare the type when you create the variable, like so:
string \$myVariable = 'hello'
We can see that the word 'string' has been added before the name of the variable. It may look like a detail, but believe me, it's great to not have to declare the type of a variable each time you create a variable, when you have 300 different variables and your program !
The most common type of variables are:
- string: it's a string of letters, what we usually call 'text'. For example, variable='I am a string variable". The syntax is: declaration of your variable / '=' sign / content of your variable, between quotation marks, to tell python that it is a string.
- int: integer, a whole number. Same syntax, we declare the variable, add the '=', and give a number to show it's a variable of type integer. So 0, 1, 43, 84, ...
- float: Floating point number. Same syntax. myFloatVariable = 3.1415
- list: List of several elements. It can be several words, numbers, or anything else. It can even be a list of elements of different types (one string, one float, one int in the same list), although I'd suggest that you try to avoid it, at least at the beginning, in order to keep things clear. To create an empty list, we do: myList = []. For example:
  myEmptyList = []
  myStringsList = [\"hello\", \"bonjour\", \"pasteque\"]
  myFloatsList = [1.23, 3.14, 12.3523]")
We can see that the only thing those 3 variables have in common is that they're all lists, as we can see because of the brackets. So to summarize, 2 brackets, and elements separated between each other with a coma.
Functions
Python, like many other languages, allow you to create your own functions. But it's also shipped with tons of pre-written functions, available by default, pretty much mandatory for any program you'd do ! No need to re-invent the wheel for each new tool you write. For example, if you want to know the type of a variable, you can run:
  myVariable = 'hello world'
  print type(myVariable)
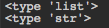
Python will return automatically the type of variable, so int, float, string, list, etc... Here, obviously, i'll get back 'str', which means my variable is of type string
Here are a couple of other pre-written function. I won't spend too much time on the functions, because as we said in the introduction, the goal is to start as fast as possible to do things in maya ! len(box): returns the length of a variable. For instance, if i say: myVariable = 'Cooking' then the function len(myVariable) will return me the value 7. Indeed, the word 'cooking' has 7 letters.
print, in a way, is also a variable. I ask maya (or python, to be accurate) to print the content of my variable with: print myVariable
If I want to change the content of the variable 'box' (that we created at the beginning) from an int (box was equal to 10) to a string, I can call the function str (for 'string'), with the following syntax:
  box = str(box)
  # I update the content of my box, so from now on,
  # it'll have a value of '10', as a string
Of course, it won't convert '10' into litteraly the word 'ten' ! But for python, from this point, the variable will be considered as text. It might sounds a bit abstract for now, but you'll understand better soon.
There are loads and loads of other functions, all of them are not useful for our needs. The best is that you look on internet when you need something, there might be a function to do it already. Here is a list of some useful functions (that may not be self explanatory for now, but you'll understand better once you'll have to use them)
- split (): allow one to 'split' a variable into different parts. For example:
    myVariable = email_address@domain.com
    myVariable.split('@')
The result will split what is before the @ from what is after, and return the two elements as a list (the first element will be email_address and the second will be domain.com) - title()
- capitalize()
- upper()
... Those are some useful fonctions to maniuplate text (switch from lowercase to uppercase, switch only the first letter, etc). The replace() function is also very useful to ... replace elements of a variable ! For example:
  address = c:/Users/Documents/myMusic
  address.replace ('/', '\')
  # The result will return the same path, but with \ instead of /
Careful ! Although I strongly recommand that you test on your side every piece of code I write here, there is a little trap for this last one, and it won't work as it is ^^
Second part: Application to Maya
Importing modules
Here we are ! We'll finally be able to apply those concepts to maya, in order to make our daily tasks easier !
To begin, we'll put all we've seen in the perspective of maya. Python is a very popular language, used widely, where anybody can add powerful libraries. For example, for Maya, the commands we need are very specific to 3d, like creating a sphere, opening the hypershade, etc... All those commands are contained in a library that we'll load at the beginning of our script, everytime. So let's declare to our interpreter that we'll use the module named maya.cmds. We'll start with:
import maya.cmds
Once it's done, we can use any maya command we want, like polySphere(), that will create a sphere. Problem is that it's a bit heavy to write, for each action, maya.cmds.nameOfTheAction(). So a general convention (that is also used in maya documentation) is to write:
import maya.cmds as cmds
By the way, you can see that the word 'import', as one of the keywords of python language, is displayed in green. So for this line, we see that we first import the maya.cmds module, but 'as' cmds. Once this line is written, we can simply write cmds.polySphere() instead of maya.cmds.polySphere(), to create a sphere ! Of course, cmds is a convention, but you could completely do import maya.cmds as helloblablabla, and prefix all your commands with helloblablabla.polySphere(). As I said, maya is using cmds as a convention, but you might find some codes importing maya.cmds as mc (stands for maya commands). I personnaly don't recommand that, for many different reasons, but 1. don't be surprised if you see it, and 2. that's your call ^^ do whatever you prefer !
There are a lot of different libraries, and we won't use only the maya one. In fact, that's another huge benefit of python over mel, you can take advantage of any library you need ! time, to work with.... times, random to generate random numbers, maya.OpenMaya to work with the maya API in python, sys or os to work with more common operating system operations, numpy to work with scientific datas processing, sklearn if you do machine learning, etc etc. You can even work with the module maya.mel to call mel commands inside python !
Long story short, no matter what you're doing, in 99.9% of the situations, you'll have to import one or many modules, depending on your needs ! For all the following examples, I assume that import maya.cmds as cmds has been done, and it's probably more than enough for our needs !
How to guess the name of the functions ?
In order to find the python commands you need in the maya.cmds library, you have 2 possibilities:
In the script editor, you can see the 'translation' of every action you do in the viewport. For example, when creating a sphere, we can see that the script editor will output this:

Every action done in maya is translated into the script editor (it might be useful to check, in the script editor window, under 'History', the option 'Echo all Commands', if you want the script editor to write some commands that it usually doesn't write). You can see that it's mel, as it doesn't look like what we've just seen. But it's not a problem, because the python syntax is pretty much the same, except that we prefix with cmds.
So, for our example of sphere creation, we notice that the command used is « polysphere », followed by some characters behind (we'll deal with it later)
We go to the great Maya documentation ! You can access, through this link, or on autodesk website directly (google it), or by pressing F1 in Maya. Finally, you can also download the complete help off-line if you want to be able to script without internet (for example, in my school, we didn't have internet, nor scripting lessons, so it was useful for me to download the help).
On this website, what we're looking for is in the left-hand column, bottom of the column, in the 'Technical Documentation' part. Unfold this menu to find the part named CommandsPython. Everything is here ! All the comamnds you may need are available and well described here. So you can navigate to polySphere, and click on it to see what maya tells us about it. Once on the page of the command, you can even scroll all the way down to see some examples:

It's time to flag that every line starting with a #, in python, is a commented line, which means it won't be read by python, it's just a helper for the reader(s). We'll come back to it later.
I personnaly work a lot with the examples, they are most of the time pretty relevant, and let you copy / paste a piece of code that works on its own.
To conclude, keep in mind that you can find all the information you need in maya AND on Autodesk website. In general, we combine those 2 sources of information. We start by checking what the script editor says, then we go to the documentation to have the correct syntax, as well as all the details needed to use the command properly.
A little bit of syntax
We'll now start to analyse the example above, and from there, we'll try to understand the syntax maya expects, for almost 99% of the situations
As seen in the listener, the command to create a sphere looks like this:
polySphere -r 1 -sx 20 -sy 20 -ax 0 1 0 -cuv 2 -ch 1; that we extend like so: nameOfTheFunction -option1 value -option2 value -option3 value -option4 value;
It should make much more sense now. So the syntax is: name of the function, followed by options. In maya, we call those options 'Flags'. In most of hte situations, flags are optionnals, or in other words, a default value is given if the user doesn't specify any value. For example, I can create a sphere with the command polySphere(), but maybe I need to give a different radius than 1 (the default value), less subdivisions, etc etc. All those ifnormations come from the flags. Once again, no need to specify all the flags for each function you call, as every flag has a default value. You'll also see that every flag as a short version and a long version, and the script editor returns the short version (hence the confusing look of what it returns !). For example, you can specify a radius for your sphere with the flag radius, or just r.
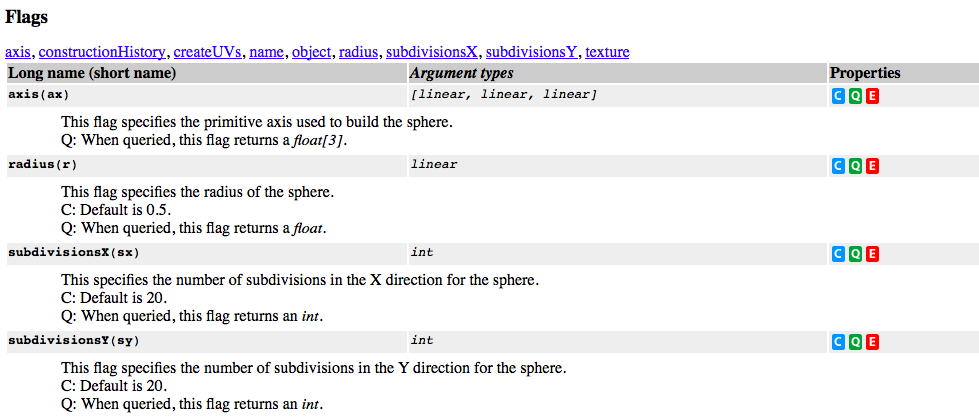
On this screenshot of the documentation, we can see that it's all well explained, each flag is described, with the short version next to the name of the flag. In the 'argument type' column, it's also said which type of datas is expected. For example, for the subdivisionsX flag, we need to give a value of type int (which makes sense... the number of subdivisionsX can't be 'potato' or 2.34).
Then, we can see that the syntax is similar to mel: function - flags The function is given first, with the cmds prefix, then the flags, in parentheses. If we compare, we'll have: Mel (and script editor): polySphere -r 1 -sx 20 -sy 20 -ax 0 1 0 -cuv 2 -ch 1 Python (after importing maya.cmds as cmds): cmds.polySphere (r=1, sx=20, sy=20, ax=(0,1,0), cuv=2, ch=1)
Voila ! It may sound a bit too early, but I think we have everything we need to jump to some practical exercices ! And keep in mind that the only way to learn how to script is by doing it, again and again !
Exercise 1 - renaming an objet
As said in the previous part, in order to learn python (or any programming language), it is absolutely mandatory to practice. Therefore, from now on, we'll work with a serie of exercices that we can do together, so that you can start to assimilate what we've seen so far, and add new informations as we need them. I also encourage you to submit some ideas of 'basic' scripts that you'd like to be done here. But let's begin with the first exercice
Basic concept
To practice variable manipulation with maya, we'll create a program to add a suffix in the name of an object, in the outliner. It may look a bit useless, because it's pretty much the same thing than double-click in the outliner to rename an object, but we'll see later how to extend this simple operation to 10, 50 or even 1000 objects, without having to do it manually !
For the first part, we already have all we need ! As most of the times, there are 100 differents ways of doing it, and unfortunately a first trap =) For the beginning, nothing crazy, we just import the modules we need. Here, maya.cmds:
import maya.cmds
Then, no need to rush. As a general rule, it is very important, before starting a new script, to step back and see all we need. It may look a bit useless, but believe me, it's a huge gain of time, and will allow you to produce cleaner, well structured code. So let's see what we need:
- The object we have selected
- The suffix we want to add
- The new name of the object (old name + suffix)
To make things easier, at least at for now, I recommand that you create a variable for each element. You should have something like this:
  selectedObject = 'objectToRename'
  suffix = 'suffix'
  newName = selectedObject+suffix
Notice a few things: The two first variables are of type 'string', because between quotation marks. The third variable has no quotation, because we wnat to add the variables (that contain strings already). When, in the variable named newName, we add the two other variables, you have to understand that the computer will replace the variable by its content, which is here 'objectToRename' and 'suffix'. And to conclude, you can understand that this is just a way to get used to variables and how it works. There is no object in my scene that is named 'objectToRename', and I could have write newName = 'objectToRename' + 'suffix'. So now, let's see how to get the name of the currently selected object and store it in a variable !
Store the current selection inside a variable
To get the selection, we use one of the few maya commands with a name that is not really obvious. It's the command ls. Don't freak out, this command is such a common thing that you'll use again and again that you'll memorize it soon enough ! And for people familiar with Unix, ls shouldn't look to strange to you =]
This command can list different things, regarding the flag we pass, but what we're interested in is the selection. If we refer to the documenntation, we can see that the flag we're after is called 'selection', and we can even find an example at the bottom of the page:

So our first line looks like that:
selectedObject = cmds.ls(selection = True)
What we do here is we ask Maya to look at the current selection, and save the result in a variable that is named selectedObject. Let's ask maya to print the content of selectedObject, just to double check it does what we want. Of course, remember to select an object before...
  import maya.cmds as cmds
  selectedObject = cmds.ls(selection=True)
  print selectedObject
... and the script editor should return:

Perfect, it returns the name of the selected object (on my machine, an object named pSphere1) ! By the way, I'd like to bring your attention on the notation: maya returns [u'pSphere1'], with brackets, and not simply 'pSphere1', because it is a list: In our case, it is obvious that a list is not needed, as we select just one element. But Maya can't know that before it tries. And we definetly don't want to have 2 different functions doing the same thing, one for only 1 object, one for more than 1 object. So by default, the command 'ls' will return a list, as said in the documentation:

string / square brackets / square brackets, or, in other words, a list of one or m ore strings (we've seen previously that [] was the convention for the lists). It may seem not important, but keep it in mind for when you'll try to do an operation that can be done only on a string (like title(), for example). Even if there is just one element, it is still a list ! Anyway, let's continue ! We'll now set the variable that we'll use as a suffix, so for me, it'll be '_msh', for mesh.
  import maya.cmds as cmds
  selectedObject = cmds.ls(selection=True)
  suffix = '_msh'
Here again, the syntax color helps us ; look at the quotation marks ! For now, we don't know yet which type of variable we'll need, as we didn't check the documentation yet for the 'rename' function, but we can assume that with a variable of type 'string', we should be close to what maya expects ! And even if we're not, we can just come back to this line and change it, or even convert it into another type if needed. We can also define the variable newName, which will be the name we'll give to your object:
  import maya.cmds as cmds

  selectedObject = cmds.ls(selection=True)
  suffix = '_msh'
  newName = selectedObject + suffix
So the new name will be equal to the old name + the suffix (Math 101 ^^). Let's run that and see if everything works correctly.

We've got an error, great! I know that when working with a soft like Maya, most of the time, the red error message can be seen as a problem. But as a scripter, you'll learn to love the error messages ! Indeed, when an error is displayed, maya petty much gives you the solution to your problem ! If you take some time to read what it says, you'll see that most of the time, it's pretty accurate, and the main skill you need at first to be able to do what you need is to understand the errors (don't worry, you'll see about 4 or 5 different errors and that's it, you'll always have the same errors !). When you'll jump to maya API for example, you'll miss the errors: maya api usually fails without telling you ! So your script doesn't error, but the result is not as expected (or maya crashes...). So learn to love those error messages, when you won't have them, you'll miss them a lot ! So let's have a closer look at this one:

From now on, I strongly recommand that you always keep the box "show stack trace" checked, in the script editor window, in the History menu. The error returned by maya will be more accurate. So let's see what maya says:
Basically, it seems that there is a problem with line 5 (so the line newName = selectedObject + suffix), and more precisely, that he can concatenate (i.e. 'assemblate', 'add') a list (not a string) to a list. Remember what we've seen about type of variables ? It's time to use it ! So in other words, one of the elements we put in our addition is a list, whereas the other one is a string. And it makes a lot of sense that we can't add two variables of the same type, if we think about it ! Could you tell what would be the result of 33 + potatoe ? Or 3.14 + ['homer', 'bart', 'marge'] ? Python neither =]
So, which element is a list, and which is a string ? Now the the error can orient our searches, the first thing to do is to test the type of variables. Luckily, we've seen earlier the function 'type', to check the type of a variable, so let's use it:
  selectedObject = cmds.ls(selection=True)
  suffix = '_msh'

  print type(selectedObject)
  print type(suffix)

  # newName = selectedObject + suffix
You noticed that we've commented out the last line. The idea is not to add explanations on what we're doing, we just don't want to have to write it again once we'll find the solution, so in the meantime, we comment it out. It's still here, it won't be read by python though. And the script editor returns:
Indeed, selectedObject is a list, and suffix is a string. Remember, we've seen that cmds.ls() returns a list of string, even if only one element is selected ! Once again, I won't go into details, but just know that you can isolate the elements of a list, by giving an index between square brackets at the end. If you want to get the first element of a list, for example, you'd write: myList[0]. This is called 'slicing', and we'll discuss it further in the next chapter.
So back to our problem, if we want just the first element (and in our situation, the only element) of the list of selected elements, all we have to do is to add [0] at the end of line 3:
selectedObject = cmds.ls(selection=True)[0]
Now if you run once again the whole code (so un-comment the last line), you'll see that we no longer have an error.
The rename command
Now, we come to the biggest part, and the new thing: the rename command. If I rename my sphere pSphere1 in the outliner (to pSphere2, for example), the scriptEditor will return:

So it looks like maya uses a command named 'rename'. So instinctively, if I'd try to convert into python like we've done before with polySphere, it should look like this:
cmds.rename('old name', 'new name')
But let's check the documentation anyway. By the way, I recommand that you always keep an eye on the documentation. Even if you may not understand every detail for now, you'll get used to the structure of it, and little by little, you'll start understanding better this or that part. For now, let's jump to the examples (I told you, I love the examples !)

We can see that for the rename function, two arguments (two informations) are needed:
- The name of the object we want to rename (hence the need for having only unique names in the scene ! Otherwise, maya doesn't know which one you want to work with)
- The new name, the name we want to give to the object we choosed in the first argument. So for us, it'll be the old name + the suffix ! Both are separated with a coma !
Easy peasy lemon squeezy! so we'll have:
  # I rename 'pSphere1' with 'pSphere1' + '_msh'
  cmds.rename(selectedObject, selectedObject + suffix)
So it should be all good. Let's re-select our sphere, and run the code !

And here is the result ! Your object pSphere1 should have been renamed to pSphere1_msh !
Of course, in this exercice, the benefit is more than limited.. we could have rename our object with a double click in the outliner, instead of spending 15min to do something doable in 3sec... But we'll see how to make all of that more usefull =)
Third part: lists and loops
Working with lists
There is a type of variable that is a bit different, as we've seen: lists. If you've read everything so far, you probably understood already that lists are kind of a stack of variables. To create a list, we've seen earlier the syntax: myList = [] In a list, every element has a number associated (an 'index'). Therefor, if
myList = ['homer', 'marge', 'bart', 'maggie']
by printing myList[0], I'll get the first element of the list, 'homer' ! This is what we've done previously to get the first element of the list returned by cmds.ls(). As a reminder, we work with computers, which means we start counting from 0, not 1. So the first element of a list is element 0. Now let's try things (remember you can't 'break' anything, so please, if you wonder which result this or that could produce, just try it !). Let's try to access the 10th element of the list, by printing myList[9]. Maya will return an error 'list index out of range', which says literally that the index we gave for this list is out of the range (the length, if you prefer) of the list.
We're not here to learn every operation we can do with a list, you'll see that step by step, when you'll need it. Just keep in mind that you can do pretty much everything you could need with lists:
- keep the x first elements of a list
- keep the x last elements of a list
- remove the x first elements of a list
- remove the x last elements of a list
- append elemnts to a list
- remove elements from a list
- etc etc
Loops
Finally, here we are ! All the boring stuff we've learnt so far were here just for this final chapter ! The most obvious benefit of using python in maya is to make things automatic ! Let's imagine, for example, that we want to add this '_msh' suffix from exercice 1 not only to 1 object, but to 400. The 'normal' way of doing it would be to do it through the outliner, and you'd not do it manually (I wouldn't, at least !). One can say that there is an option of search and replace in maya, but don't be so picky ! Another example would be to add a prefix regarding the type of the target node (mesh, nurbs, multiplyDivide, group, whatever). The scripting approach for this problem is using loops. Once again, we won't go through all the possible lists available in python, and will focus on 'for' loops.
Let's start with the syntax: once again, let's write it 'as we think', the way that feels right to us, and we'll fix it later. With python, I suggest to process like that, at least at the beginning, so that you'll see that python is pretty much english... the syntax is as simple as that ! By the way, this workflow (writing stuff 'as it is', in english) is a great help for later, and it is even so common that it has a name, it's called 'pseudo-code'. Anyway, let's go!
  For each element in my list:
  do operation 1
  do operation 2
  do operation 3
  leave the loop
Now let's see the python translation:
  for element in myList:
      operation1
      operation2
      operation3
I'd like to draw your attention on 4 points:
- As you see, it is almost english ..
- The syntax color is helping us, once again, remember to use it.
- Probably the most important: i wrote 'element', but you can write anything you want instead. All you need to keep in mind is that the word you'll give here (instead of element) will have a different value at every step of the loop ! Hence the name 'variable' ! It'll 'vary' at every iteration of the loop ! For example, run the following code:
  for element in ['homer', 'bart', 'marge', 'maggie']:
      print element
You'll see that 'element' will be first 'homer', then 'bart', then 'marge', and finally 'maggie'. The variable element changed of value at every loop. But I could have called my variable 'simpson' or even 'sdfjsadljlajds', instead of 'element', like so:for sdfjsadljlajds in ['homer', 'bart', 'marge', 'maggie']: print sdfjsadljlajds - You probably noticed that we didn't explicitely say that we wanted to exit the loop after operation3. If you pay attention, you'll see that everything the loop is supposed to run has a different indentation. The line starts with 4 spaces. As long as my line starts with those 4 spaces, i'm in the loop. If I want to exit the loop, I can just remove those 4 spaces. Be very careful with that, the same code with different indents can have a completely different effect. For example,
  for element in myList:
      operation1
      operation2
      operation3
is different fromfor element in myList: operation1 operation2 operation3In the first one, the script will apply 3 operations on every element of my list. In the second, it'll apply only operation1 to the elements of my list. Then, it'll apply operation2 and operation3 only to the last element of the list (or to something else). So all we need to rename several objects in 1 operation is something looking like that:selectedObjects = cmds.ls(selection=True) suffix = '_msh' for element in selectedObjects: newName = element + suffixThat's it ! I know it may look very simple, but with only those simple concepts, you can already do a looooooooot in Maya!
From this point, the idea is to practice by yourself. As we said, the only way to learn python is by practicing, again and again. One exercice you could do, for example, is to labellise a skeleton. You can assume that all the joints in your scene follow a clear naming convention, and try to associate automatically a label to each joint, based on the joint's name (very handy to mirror skin weights).
To help you a bit with that, I can suggest you some rules and useful commands!
- Assume that all your joints are named with the syntax side_nameOfTheJoint_JNT (for example, L_elbow_JNT for left elbow). It is completely valid to rely on a naming convention, in a context of production
- Start manually: do at least one time what you want to achieve manually, look at the script editor output, and remember the operations you need. It's easier to do a 'draft' by hand, and only after, start doing it in script
- You'll need a method called split(), to 'cut' your string into a list (we've seen it earlier).
- You'll also need loops, of course, and conditions, using the keyword 'if' ! Google can help you with that, the idea being that you solve it by yourself. It's not rocket science, don't panic =]
To conclude with this exercice, you should be able to select all your joints and run your script to labellise at once all your joints ! Good luck, and do not hesitate to post in the comments if you don't manage to do it ! Once again, the only way to learn is by practicing, again and again, that's why I don't want to give the solution of this one ! Ultimately, now we've seen enough theory for most of the tasks needed in maya, I'd like to keep writing this tutorial as a sery of exercices, so do not hesitate to post in the comments the operations you'd like to do in python, or more specific points you'd like to understand better ! Good luck !