Table of Contents
Introduction
In this tutorial, we are going to look at the theory behind creating a deltaMush-like deformer. As a reminder, the deltamush is a deformer that has been wildly spread recently, following a paper published by Rhythm&Hues during the siggraph 2014 (or 2015, can't remember !), but that some studios have and use already since years. Of course, the interest is reduced by the fact that the deltaMush is now integrated to maya (since Maya 2016), but for people working with older versions or who just want to support their own tools and add useful features such as multi threading, adding parameters, etc etc, that can be useful! I'll try to detail as much as possible, so it might look a bit long and boring, the idea is to make it understandable to anyone, including non-scientific people !
Part 1: Let's have a closer look at what the delta mush is doing
Before we go into more detail, let's summarize what a delta mush is actually doing. I won't put too much images from maya to show you the details, I assume you can get any example you want either by using a maya >=2016 or by googling delta mush. Instead, let's focus on the theory !
So if we look more in depth, we can see that the delta mush is most of the time a combination of 2 operations :
- A smooth-ish deformation
- A volume preservation algorithm applied on top of that
So essentially, all the delta mush is doing is that it's smoothing your object, then re-applying somehow a localized 'bulge' effect to restaure the volume of your initial mesh.
As people usually like to give complicated names to describe very basic operations, the smoothing part is known as a Laplacian smooth (named after Pierre-Simon Laplace, google said =). But behind that fancy name, we'll see that it is the simplest way of smoothing things, and probably what you would have done yourself if you'd had to do it with no documentation ! So don't be afraid by complicated names, in general ! And for the second part, the volume preservation, we will use the difference between a base mesh and the deformed mesh. This difference is called the 'delta', hence 'Delta Mush'. Now we know a bit of what we need to do, let's start !
Part 2: the laplacian algorithm
Core
So first things first, let's sort out the laplacian part ! I always find it muuuuch easier to remove as much dimensions (or elements) as possible when doing RnD, and once i get the idea, i extraplate to 3D and add all the details ! So for this example, forget about Maya or 3D, let's look at our problem in 2D, and just on a couple of vertices.
Now imagine you'd like to make it smoother, regardless of the volume. How can we do it ? By doing an average between every vertex. In other words, let's assume we work on vertex 2 : if we want to make it smoother within the mesh, we need to work with vertices 1 and 3. So first, let's get the centroid of verices 1-3 (or as we work in 2D, the midpoint of segment 1-3).

The dot represents the middle point of each segment
From there, we can draw a line between vertex 2 and the midpoint 1-3
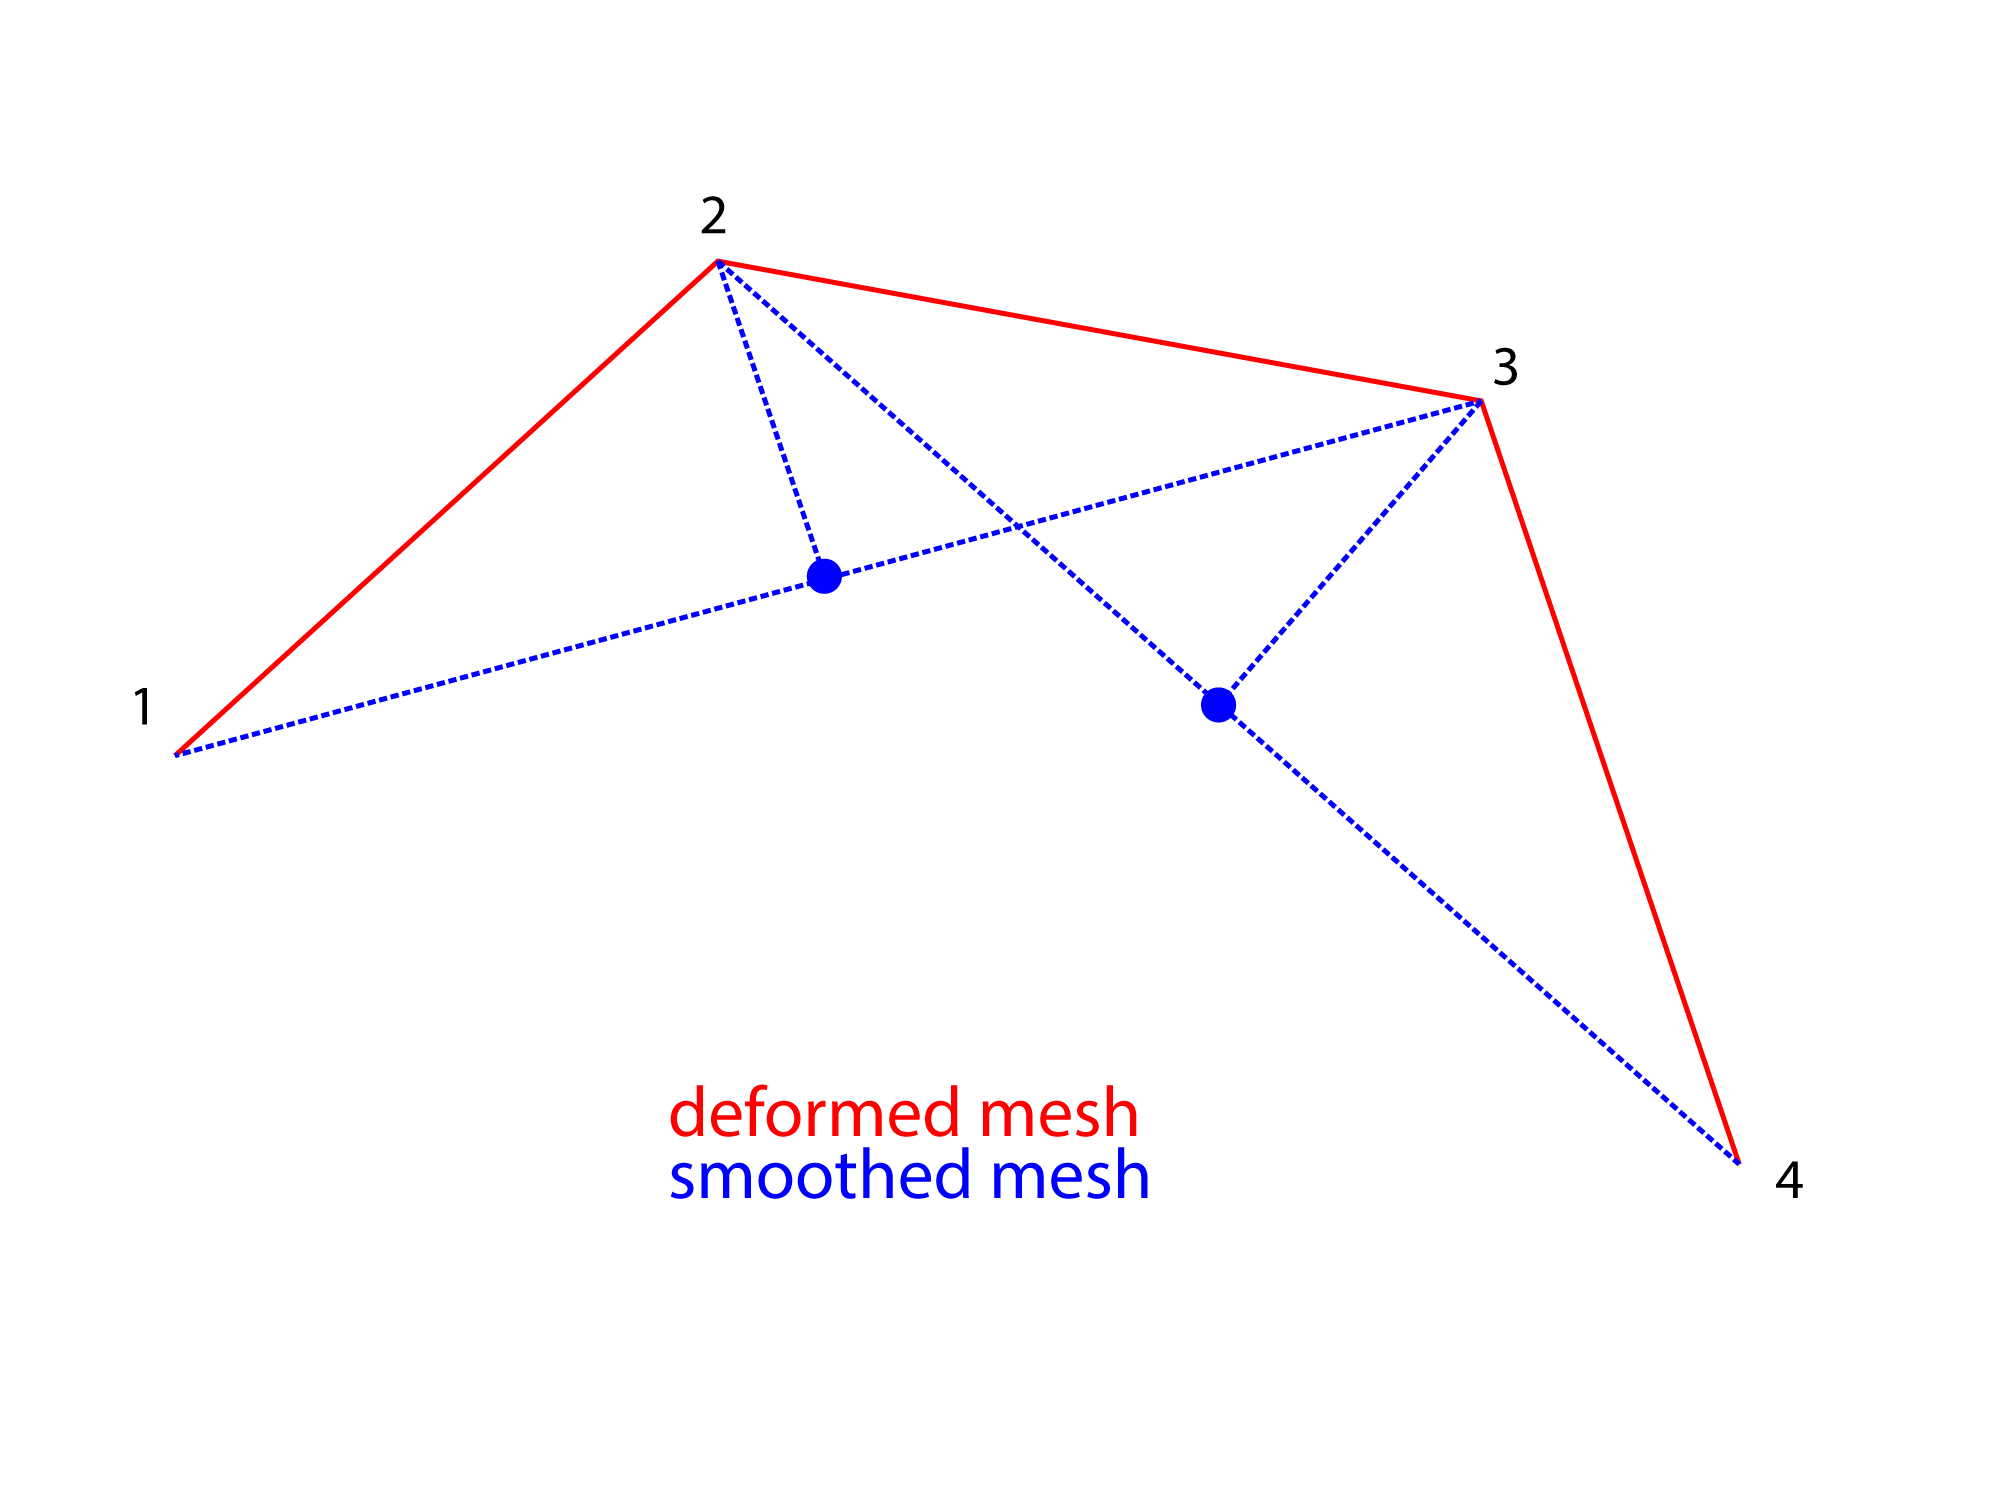
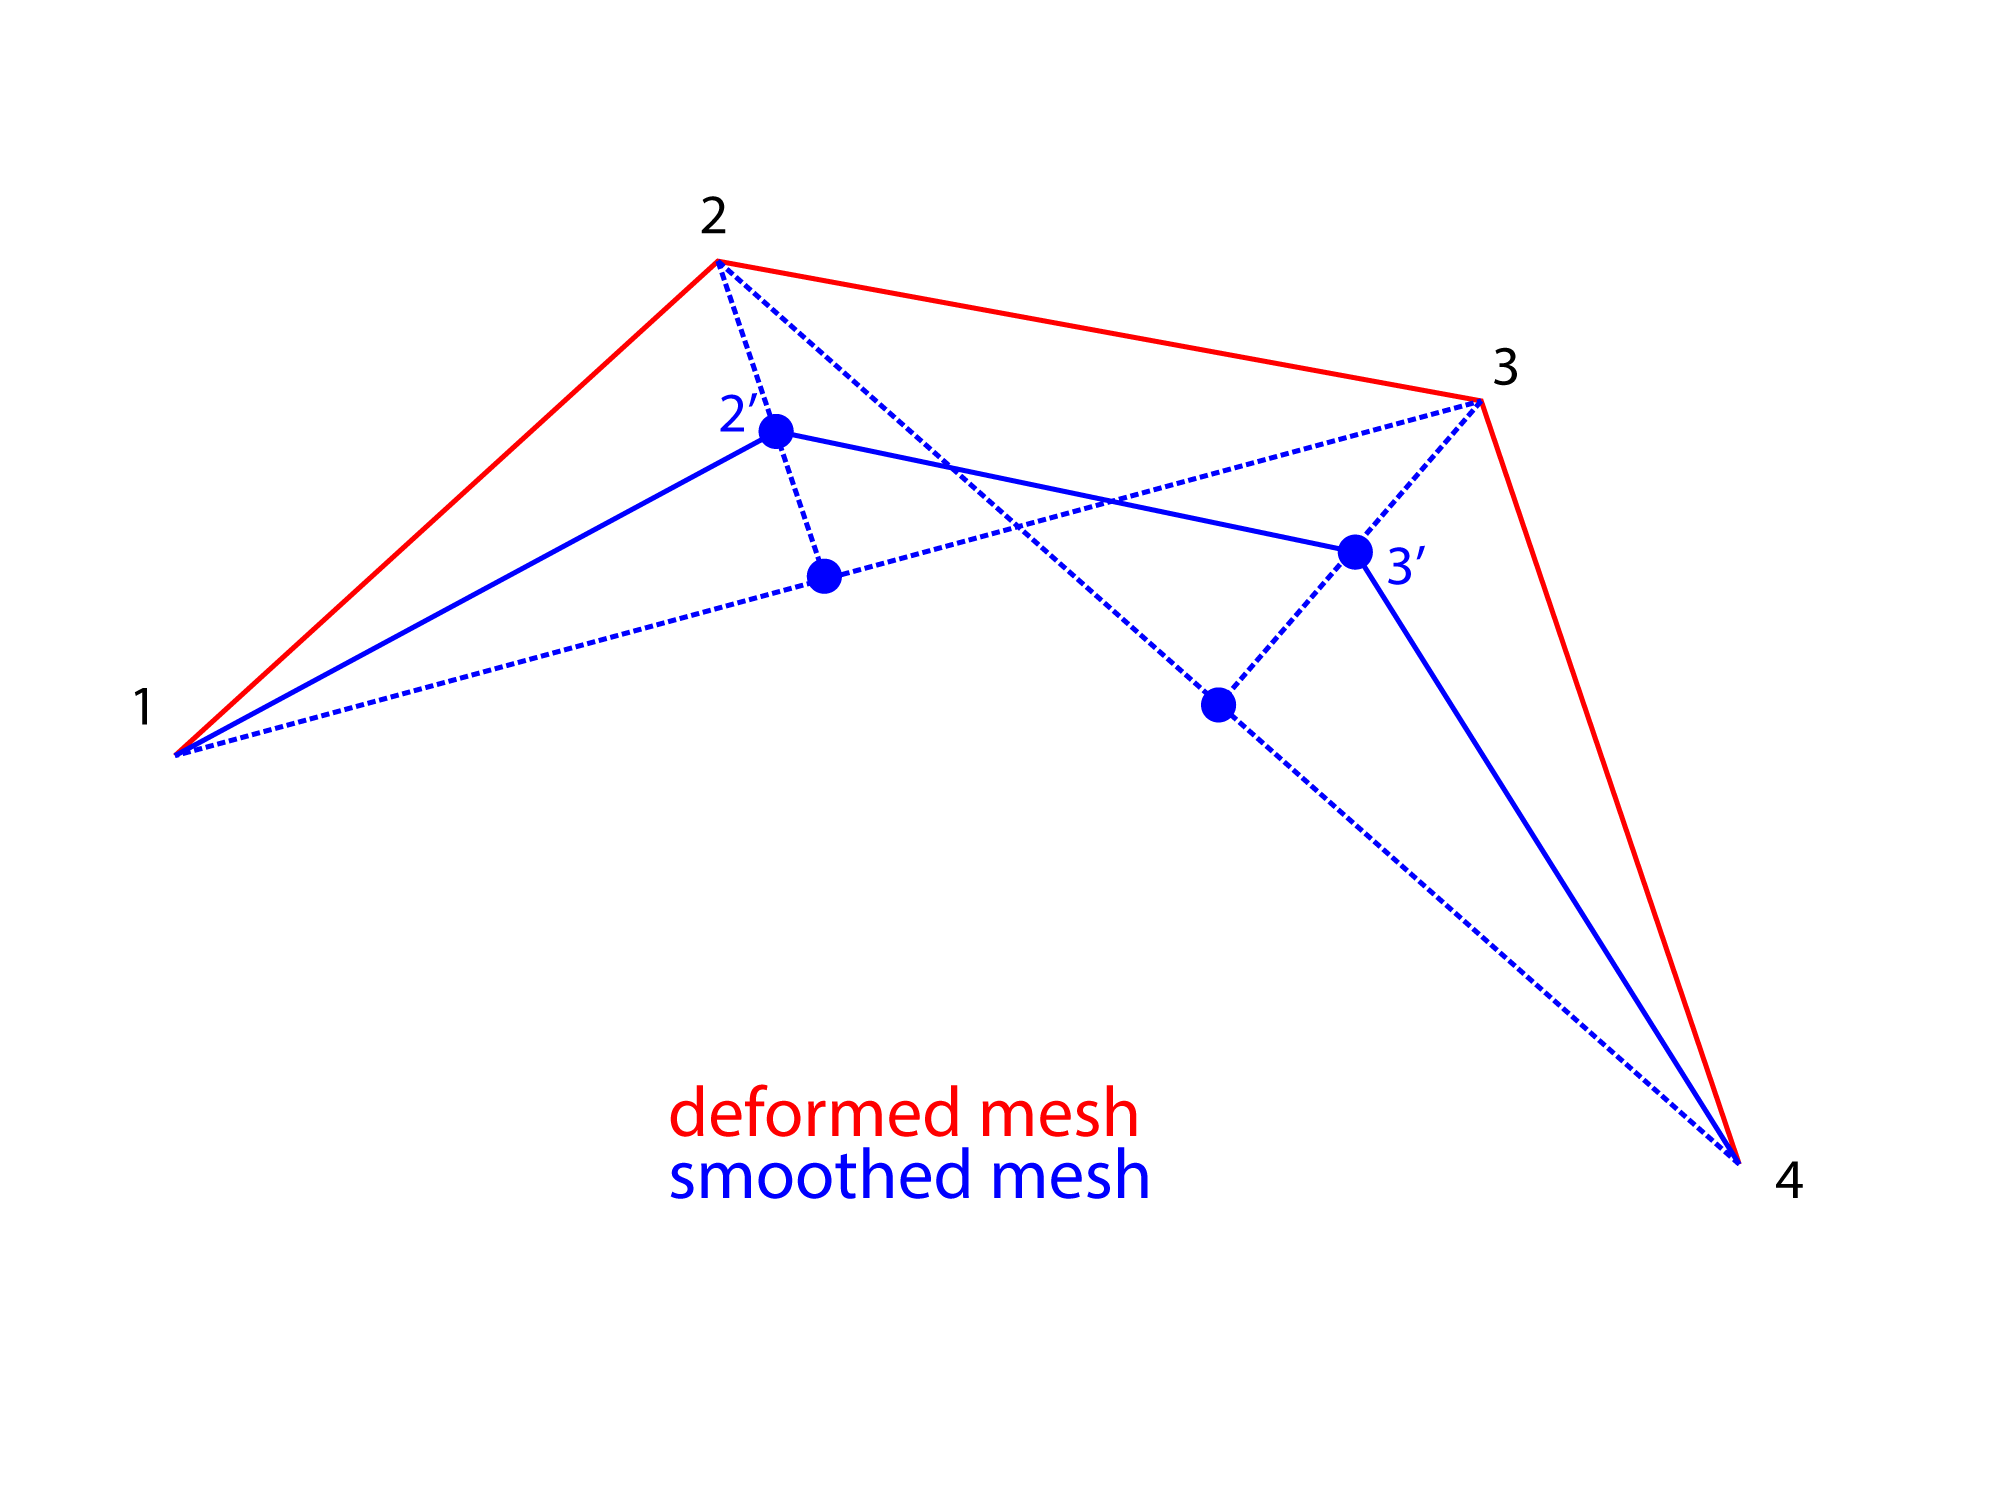
And on this line, we can take, once again, the midpoint. This midPoint will be our new position for vertex 2 (known as 2').
Iterations
Now, we can see that our laplacian algorithm seems much easier than it sounds ! But we can add another handy parameter : the iterations ! At the moment, we have just one iteration, i.e. we applied the laplacian once. But we could apply another laplacian on top of this one, which would result in 'iterating twice'. On the picture below, the second iteration is drawn in green.
 So ideally, if you expose your iteration parameter, you can let the user set as many iterations as he wants, which is similar to applying the laplacian many times to have something smoother and smoother (but also more and more shrinked).
PseudoCode
So if we summarize what we've seen until now and try to re-write it in pseudo code, we would have something like so:
  for i in range(iterations):
      for v in allVertices:
          # get adjacent vertices
          # calculate the midpoint of all the adjacent vertices (m)
          # get the midPoint of vm
          # store the new position v', on the midPoint of vm
Now, let's move on to the second part, the volume preservation !
Second part: the volume preservation
Theory
Ok, now that we have our laplacian, we can focus on what the volume preservation is doing.
If we refer once again to a very simple example, we understand that if we want to re-apply the volume, we need to save the volume lost, somehow. So for vertex 2, this volume can be seen as a vector (a direction and a magnitude), running from 2' to 2.
If we add this vector (let's call it Delta) AFTER our deformation, we should have our initial volume back!
Obviously, that means if we apply the volume preservation to our mesh in bind pose, it should come back to its original state, just like if we'd set the envelope of our deformer to 0.So, what's the idea of volume preservation ? Ideally, you can assume that your model is good (if you start fixing (too much..) your model in rig, something went wrong). So the noise you want to fix might come from a deformer, a rough skinning, or whatever happened during the rigging process. The idea of having a base mesh (which is brillant, i strongly recommand to always expose the baseMesh parameter, by the way, even if Maya tend not to do it) is that your deformer will always be 'aware' of what is its default pose, what it is supposed to look like. Even better, with the base mesh exposed, you can also plug different meshes (not necessarily the baseMesh), just like you'd do with the base cage lattice, and perform all sort of funny hacks ! So, if we see it as a stack of deformations, we would have:
- base model : coming from modeling, a super simple set of vertices, essentially.
- deformation(s) : skinning, or any deformer that creates a noise or a not-so-happy result
- deltaMush : we come afterwards and smooth our model to get a nicer result
So here comes the most important part: We want to iterate our laplacian smooth onto the base mesh, and save the delta in an array Then we want to iterate again our laplacian smooth, but this time, on the output mesh (the mesh that comes after the deformation layer) Finally, we want to re-apply the delta, stored during the first step, back to the output mesh, after smoothing.
Example
If you want to get a pseudocode example, feel free to send me an email and I'll update one