
Table of Contents
Intro
In this tutorial, we're going to see from A to Z a method to create a full stretchy ik. Before starting, i'd like to highlight the fact that there are probably as many ways of doing a stretchy ik as there are riggers! You're more than welcome to create your own method, once you'll be aware of advantages and weaknesses of each method. The idea behind this tutorial is mainly to manipulate some nodes and attributes and play with them to see the result! With that said, let's begin!
Creating the scene
For this tutorial, you'll need a 4 joints chain. The first one will be 'shoulder', the second will be 'elbow', the third will be 'wrist', and the last one will be 'wristEnd'. You'll also need 2 IKs: an ikRotatePlane, running from shoulder to wrist, and a ikSingleChain, from wrist to wristEnd. You probably want to create a controller too, that we'll call cc_hand, and to apply a freeze with group / zero out on top of it (to keep its orient but clean its values). Last but not least, create a poleVector (named pv), on the ikRP, and apply a freeze with group on this one as well. You can also add some modeling, influenced by your joints, if you want to have a visual feedback of your modifications, although it's not crucial!
Concept
The idea behind the stretch (or at least behind the stretch we're about to see here) is super simple: we'll try to get a value that'll be equal to 1 in the default position, and that'll get bigger when we'll stretch out the arm. That way, we'll just have to plug this value into the scale of our joints (set to 1 by default) to get the stretchy effect. Notice that in some situations, you may want to manage your stretch with the translate attribute instead of the scale. As far as i know, there is no one method better than the other, and after trying both, i prefer to use the scale, that looks easier to me (i can use the translate version in some situations though). But it's really a matter of preferences (the scale-based stretch will be less efficient if your joint deforms some vertices that are behind him, but the translate-based won't produce a falloff-ed deformation), so feel free to look after some other ressources and tutorials if you prefer to do a translate-based stretch ( we may do one, eventually, on 3dBunk =).
Anyway, we'll start by setting up this first step: get back a value that is equal to 1 when the arm is straight, and that becomes bigger when the arm should stretch (i.e. when the cc_hand goes far from the shoulder). Then, we'll add a few useful functions, like stretch activation, a clamp attribute (to set a limit to the stretch), and so on...
In order to get the value we were talking about before (we'll call it the ratio), we'll just divide the 'dynamic' length of the arm (we call 'dynamic length the length between the shoulder and the cc_hand, which will be changed in real time, when the animator will move the cc_hand) by the constant value (the distance from shoulder to elbow + the distance from elbow to wrist, by default, without touching the joints). Let's start!
First step: basic stretch
Dynamic distance
Firstly, we'll need something to measure in real time the arm distance when straight. You can already create 2 locators. The first one (loc_distRoot) will be snaped to the shoulder while the second (loc_distTop) will be snaped (and parented) to the cc_hand. Of course, be careful to not parent the second locator to the wrist bone itself, which will be scaled (if you do so, you'll end up with a cycle: the wrist bone will move the locator, which will increase the scale in the wrist bone, which will cause the locator to move, and so on)

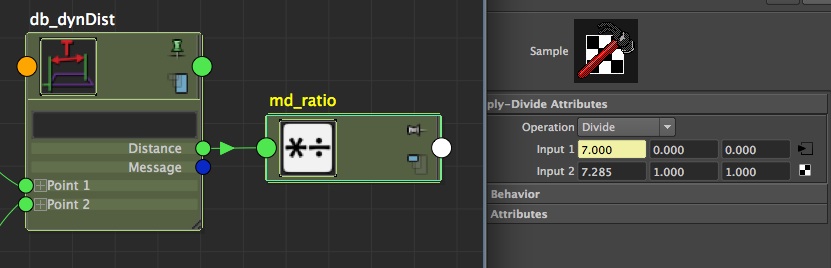
Graph now those two locators in your node editor (our interest is on the shapes, not the transforms). The interest of using locators is that they come with a very handy attribute called worldPosition, which gives us a world position regardless the parents' hierarchy. Create then a distanceBetween node (db_dynDist), and connect the loc_distRootShape.worldPosition to the point1 of your db_dynDist, and the loc_distTopShape.worldPosition to the point2 of your db_dynDist. No surprise here, your distanceBetween node returns now, through its attribute 'distance', the always up-to-date distance between shoulder and wrist

Fixed distance
Secondly, we'll need the actual distance of the arm, when it's straight (i.e. the distance between shoulder/elbow added to the distance between elbow/wrist). Be careful to not take the distance between shoulder/wrist in the bind pose, as the arm is usually a bit folded in bind pose and not totally straight. To do so, we have two methods:
- Create a distance tool running from shoulder bone to elbow bone, then another one from elbow bone to wrist bone. Get the sharp distance of each measure tool then add them:
  firstPart = cmds.getAttr('distanceDimensionShape1.distance')
  print 'firstPart ==> ', firstPart
  secPart = cmds.getAttr('distanceDimensionShape2.distance')
  print 'secondPart ==> ', secondPart
  print 'first part added to second part: '
  print firstPart+secPart
of course, replace 'distanceDimensionShape1' and 'distanceDimensionShape2' with the name of your distance tools if you use different names - For people who want to auto-rig it, you can get very easily the distance between two points if you know their vector, using some basic trigonometry rules.
(hint: it starts with:
  import maya.OpenMaya as om
  a = om.MPoint(*cmds.xform(point1, q=True, ws=True, t=True))
  b = om.MPoint(*cmds.xform(point2, q=True, ws=True, t=True))
and ends withdist = a.distanceTo(b)
)
In my scene, i've got 7.28538328579. You can remove the distanceTools, but be sure to save this value for the next step, and to save the two separated values as well (the distance from shoulder to elbow and the one from elbow to wrist). We'll use it later as well!
Ratio
Now that you have your two distances, you just need to create a multiplyDivide node (md_ratio). As an input1X, connect the dynamic distance from db_dynDist, and as an input2X, set manually the fixed distance you stored. Finally, set your md_ratio on 'Divide'
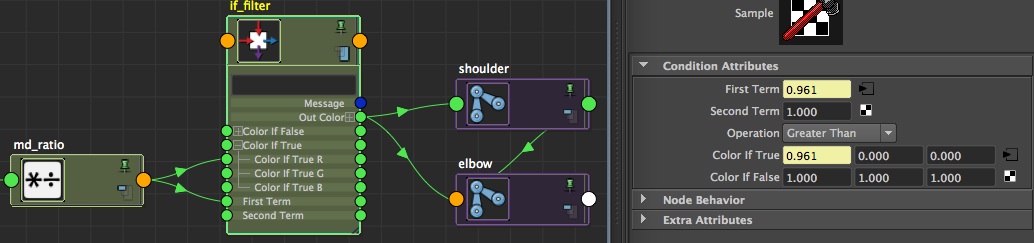
If you followed until here, you should understand what we just did: the constant distance being greater than the dynamic distance (as the arm is slightly folded), the result of the md_ratio will be less than 1. But if the arm is fully stretched out, then the md_ratio will return 1. And the more we 'pull' on the arm (using cc_hand), the greater the md_ratio will be, as the numerator will increase but not the denominator. So if we plug now the result of our md_ratio to the scale of our joints, they'll be scaled down, ending up with a shorter arm stretched out. To avoid this behavior, we need a condition node, to tell maya that it should apply this only if the ratio is greater or equal to 1 (i.e. we need the stretchy behavior only if the arm is stretched out, but we want to keep the 'folding' ability).
Condition
So what we want is to filter the result of the md_ratio node: if it's greater than 1 (i.e. if we need the stretchiness, because the dynamic distance is greater than the constant distance), we take the scale value from the output md_ratio. If it's the opposite (the arm is folded), then we return 1, the default scale value. Create a condition node 9if_filter) and connect the md_ratio.outputX to its firstTerm, and to its colorIfTrueR. In the second term, just enter '1', and set the operation to 'greater than'. Now, if the first term (our ratio) is less than 1, the condition will return colorIfFalse (as our condition will be False), which is 1. But if the firstTerm is greater than 1, our condition will return colorIfTrue, which is the ratio =] You can now connect the outColorR of your condition to your shoulder and elbow scale X (if you oriented your joints in X, or scaleY if you orient your joints in Y...).
Conclusion
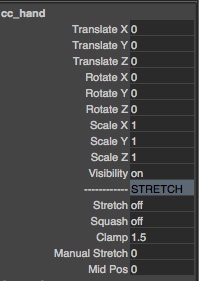
You have now a stretch! However, this is ultra basic. So in the following parts of this tutorial, we'll add a load of nice options to have a crazy funny stretch! Let's create a bunch of attributes on the cc_hand:
- stretch: enum(off:on) (I set the first term to off so that it returns 0 by defaut, which will save us a reverse node =) With that said, for those who script, you can set a different value to your enum (like 'on' returning 2 and 'off' returning 45, for instance. If you have no idea of how this can be useful, don't worry, it's not a problem for the rest of this article ^^).
- squash: enum(off:on) (same thing, off in first, for the same reasons than for the stretch)
- clamp: minimum to 1, no max, default to 1.5
- manual stretch: float, minimum to -0.99, no max, default to 0
- midPos: float, minimum to -0.75, maximum to 0.75, default to 0
Second step: extra attributes
Enable / disable the stretch
Let's jump to the node editor once again. We'll need the same node tree than before, except that we'll add our cc_hand. Moreover, i suggest that you create a unitConversion node just before the joints. The idea is to make all your connections to just one node (the unitConversion) rather than on all your joints each time. We'll use the unitConversion in the same fashion than a no-op, for those familiar with nuke. Of course, for only two joints, the benefit is not huge, but if you have a tentacle or something with much more joints, it'll be more handy to do all your RnD work like this (ok, once again, it's more an excuse to show this tip and to manipulate nodes =)

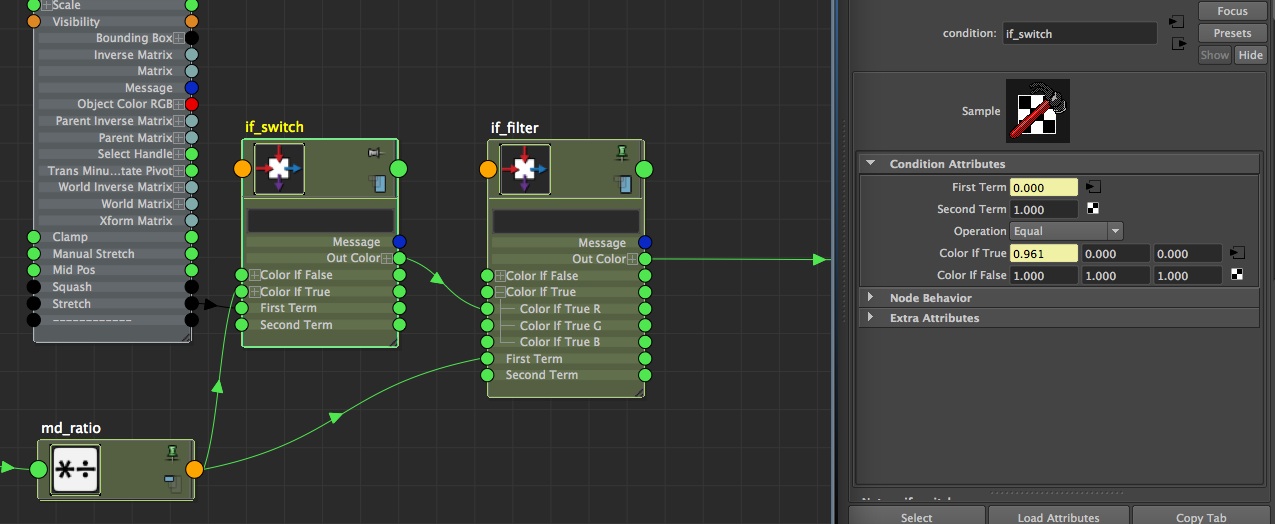
For this enable/disable attribute, nothing fancy. We'll use conditions, once again. Just as usual, let's take some time to write clearly what we want to achieve. We want to 'listen' to the attribute stretch's value: if it's equal to 0 (attribute on 'off'), then the stretch is disabled, so we want to get the value '1' for our scale. But if it's equal to 1, that means the stretch is enabled and we want to get our ratio for the scale.
Create a condition node (if_switch). In the firstTerm, plug cc_hand.stretch, and set your second term to 1. Set the operation to 'equal'. Finally, plug the result of your md_ratio.outputX in colorIfTrueR of your switch, and make sure that colorIfFalseR is set to 1 (its default value). If firstTerm equals secondTerm (i.e. if the stretch is enabled), then we take the ratio, else we filter it out and return just 1. Of course, connect then the if_switch.outColorR to your if_filter.colorIfTrueR (where the md_ratio was plugged).
Enable / disable the squash
First things first, the most common formula - and the one we'll use here - for volume preservation, at least in 3D, is 1 / square root of the ratio. Keep that in mind, although you can find it on the formulas page if necessary =] Now, applied to our situation, let's see what it gives. The outColor coming from the if_filter is the correct value, our ratio that will always be ok (the one that the animator will want). Therefore, all we have to do is to take this value and apply the formula we saw, that we'll re-plug after in scaleY and scaleZ (considering you orient your joints in X, once again). So let's do it! To begin, we need to apply the 'square root' operation. Take the if_filter.outColorR, and plug it as input1X of a multiplyDivide node (md_squashSqrt). Set the type of operation to 'pow', and the input2X to 0.5. Remember your highschool classes, applying a power of 0.5 is the same thing than doing a squareroot^^ Connect then the outputX into a input2X of a new multiplyDivide node (md_squashInv), then set the type of operation to divide and the input1X to 1. This node will return the inverse of what is given to it. Finally, connect this outputX to the scales Y and Z of your joints (or to another dummy unitConversion as we saw earlier =)
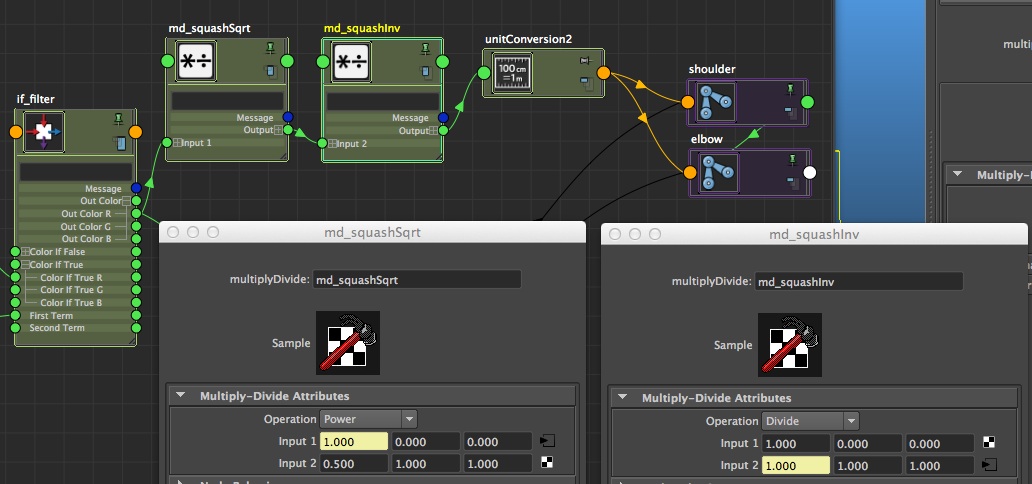
Voila, your squash is over. But as you probably noticed, the button on/off that we have on our controller is quite useless at the moment. Indeed, it's not connected to anything! You also probably noticed that the multiplyDivide nodes propose as operation not only multily divide and power, but also 'no operation'. If we refer to Maya's documentation, we can see that:

This is exactly what we're looking for! Let me explain: we want our 2 multiplyDivide to work when the squash is enabled, and to return just '1' when the squash is disabled. All we need to do is to connect our squash attribute to md_squashInv.operation (the one that has a constant value of '1' as an input1X =). So when the squash will be set to 0 (off), md_squashInv.operation will be equal to 0, which is 'no operation', and md_squashInv will return its input1, which is 1. When the squash will be equal to 1 (=On), the operation of our multiplyDivide node will be Multiply. For those who don't script, let me precise that we start counting from 0 in script. Therefore, if i list the operations of the multiplyDivide with their index, it looks like that:
- no operation ==> 0
- multiply ==> 1
- divide ==> 2
- power ==> 3
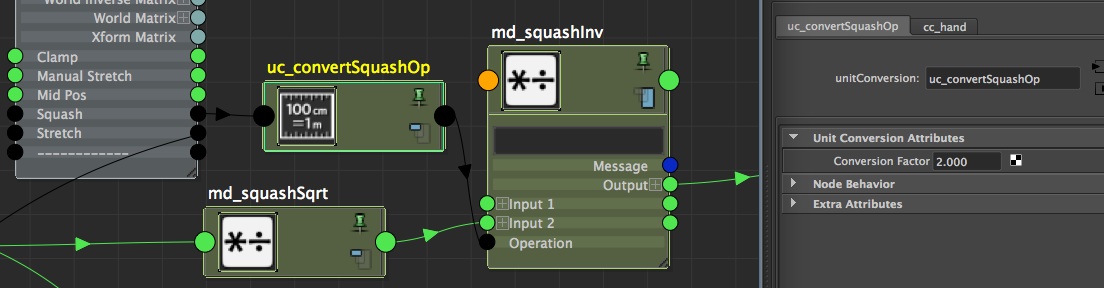
Finally, for those of you using python (or mel), know that you can also create an attribute enum that will return what you want (instead of 0 and 1). For example, if i run this: cmds.addAttr('cc_hand', ln='squash', at='enum', enumName='off=0:on=2', k=True) Our squash attribute will return - by default - 2 when it'll be On, which allow us to get rid of the unitConversion node =]
Manual stretch
What we want to do with the manual extend is just providing a way to manually animate the scale of our joints, in order to 'create' some stretchiness without moving the cc_hand. The 'manual stretch' attribute should drive our scale, no more, no less =). So we could just plug this attribute into our first condition. But in order to please our beloved animator, we set the 'manual stretch' value to 0, even though we'd like it to be 1 by default (remember, the default value for the scale is 1). So we need to add a plusMinusAverage between those two nodes. The trick, if you want to add a constant value on a plusMinusAverage, consists in the creation of a dummy attribute (that i usually call 'offset'), that you'll connect into the input1D of the same node. Three points should to be highlighted though:
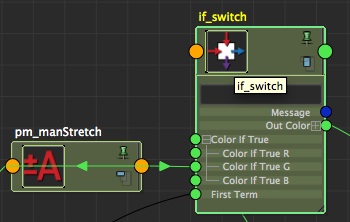
Anyway, create a plusMinusAverage (pm_manStretch) and create an attribute on this node called 'offset', set by default to 1 (we don't care about the type of attribute, we just want it to give us a 1). Then, plug this attribute into the input1D[0] of its own node. And plug cc_hand.manualStretch into input1D[1] of your plusMinusAverageNode.

Boom, done! We have our value of '1'! So now you can connect it to your first condition (if_switch). We'll use the channel colorIfTrueG though, instead of R. Indeed, we'll make this value pass through this node, but we also need to filter it out, regarding the value of the stretch attribute (on/off). So plug your pm_manStretch.output1D into the colorIfTrueG of your if_switch condition.
Then, keep the if_switch.outColorR into the if_filter.colorIfTrueR, but plug the if_switch.outColorG into to colorIfFalseR, and in the secondTerm. Keep the ratio as the first term, as well as operation on the if_filter (greater than).
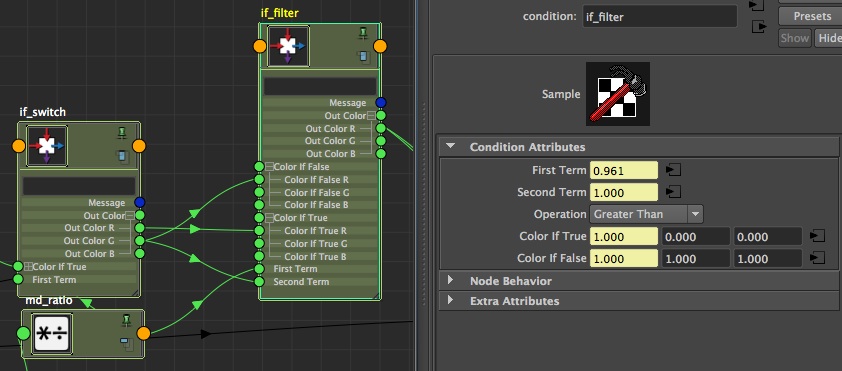
Hang on, this is not the easiest part, but it's also now that it becomes challenging and usefull, allowing us to improve our skills! So let's try to translate this shit: If the ratio is greater or equal to the value of 'manual stretch', we use the ratio. On the opposite, if the manual stretch is greater than the ratio, we use the manual stretch. We just use whatever is the greater.
Clamp
The idea behind the clamp is super simple: we add a clamp node (cl_clampStretch) between the ratio and the first condition, to let the animator choose the max value of its stretch. Graph your md_ratio, and plug its outputX in cl_clampStretch.inputR. In maxR, plug the value of the clamp attribute (coming from cc_hand). Finally, plug the result of cl_clampStretch into the colorIfTrueR of your very first condition if_switch. We just added the clamp between the ratio and the if_switch.

Mid Position
The midPos attribute will allow us to move the mid point (defined by you) of your arm. That should be used carefully though, because regarding the length of your elements, the result may not look super nice. Anyway, all we want to do is add a multiplier factor on the scale value of the joint elbow, and another one on the scale value of the joint shoulder. If both work together, it'll become easy to make the shoulder smaller while the elbow will grow up.
Let's start by creating 2 plusMinusAverage (pm_midPosRoot and midPosTop), with an 'offset' attribute of 1 on each, that you'll connect to the input1D[0] of themselves (we did it already, you know how to proceed now!). The difference between those 2 plusMinusAverage will be that the first (root) will be set to 'sum', while the second (top) will be set to 'substract'.
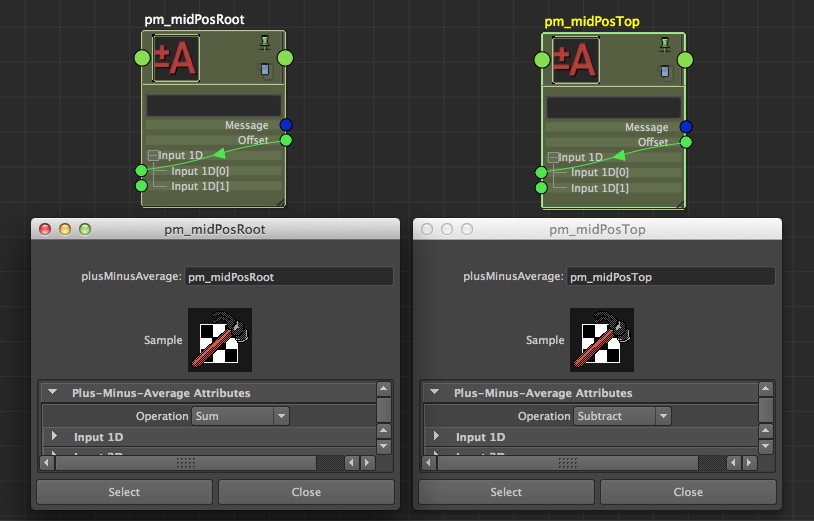
Of course, remember to connect the midPos attribute of your cc_hand to the input1D[1] of each of your plusMinusAverage (i.e. pm_midPosRoot and pm_midPosTop).
Create then a multiplyDivide (md_midPos), and connect your pm_midPosRoot.output1D to md_midPos.input2X, and your pm_midPosTop.output1D to md_midPos.input2Y (so that we'll use the same node multiplyDivide for the two parts (shoulder and elbow)) Then, connect the if_filter.outColorR in the input1X and input1Y of your md_midPos.multiplyDivide. Voila, you now have a multiplier factor for your joints (and it's the dream of many people (at least me) to be able to multiply joints...)! Last thing to do, connect the outputX to the joint(s) of the first half and the outputY to the joint(s) of the second half. Of course, for the arm, there is only one joint on each side of the 'midpoint'.

And voila, now you have your midPos attribute, which can be used to make vary the mid point of a limb. Slightly, of course! The idea is not to remodel the character!
Snap to pole vector
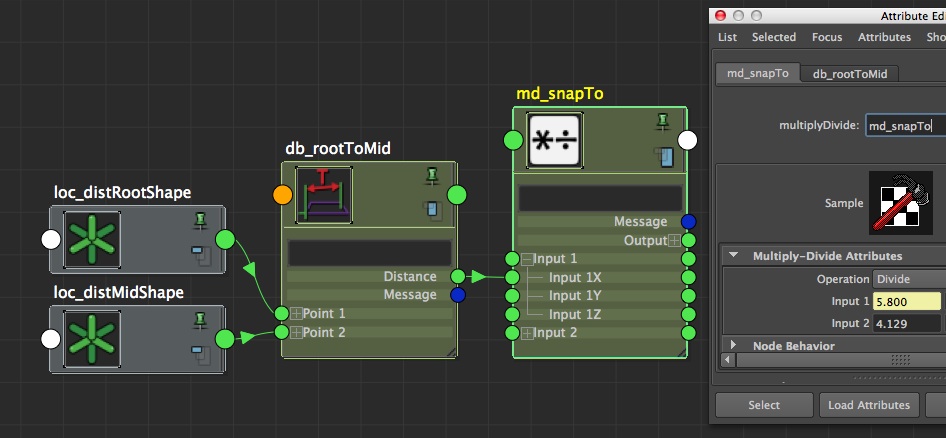
Finally, create an attribute snapToPv on your pole vector, with a minimum of 0, a max of 1 and a default value of 0! The idea of this attribute will be to allo the animator to snap the elbow to the pole vector. To do so, we'll need some extra ratios! But luckily, now we know how to do it ^^ The current scale for both shoulder and elbow is 1. So we need to find which value of scale they should have to reach the poleVector! To begin, create (and parent) a locator on the poleVector. We'll call it 'loc_distMid'.
Let's start with the first segment (from shoulder to elbow):
- Get back the length that you measured earlier (from shoulder to elbow), or, re-measure it if you no longer have it. Let's call it value 1
- Create a distanceBetween node (db_rootToMid) and connect the loc_distRoot and loc_distMid to it (the attribute you're after is the worldPosition). The distanceBetween should return you a length (let's call this one valeur 2)
- Create a multiplyDivide (md_snapTo), set the value 1 into the input1X, and plug the value 2 into the input2X. Set the operation to 'divide'
We now have a ratio that we can plug directly to the scale of the joint shoulder to change its size and make it reach the poleVector. However, don't plug anything for now... ;)
Do exactly the same for the elbow-wrist segment:
- Get back the distance elbow-wrist that you (hopefully) saved earlier
- Create a distanceBetween node to measure the distance between loc_distMid and loc_distTop
- Set/connect the two values to md_snapTo (no need to create another multiplyDivide node) to input1Y and input2Y.
The 'trickiest' part, now, consists in merging all of that with our complete system already created. But if we think about it, we realise that this last option should override all other options (of course, we don't want to use it when the arm is stretched out. Or if we do so, the the arm should fold). So all we need to do is to add a blendTwoAttributes to ... blend those two attributes (the value we had until now, coming out from md_midPos, and the value of md_snapTo), driven by the attribute 'snapToPv' of your pole vector!
Start by creating a blendTwoAttr (ba_root), then connect the outputX of your md_midPos to the input[0] of your ba_root (this is the value that will come out of the blendTwoAttr when the attributeBlender will be set to 0). As input[1], connect the md_snapTo.outputX. And of course, as attribute blender, connect the attribute 'snapToPv' of your pole vector. Do the same thing for the second half: first create the blendTwoAttr (ba_top), then connect md_midPos.outputY to ba_top.input[0], and md_snapTo.outputX to ba_top.input[1]. In the attributeBlender, plug your poleVector's snapToPv.
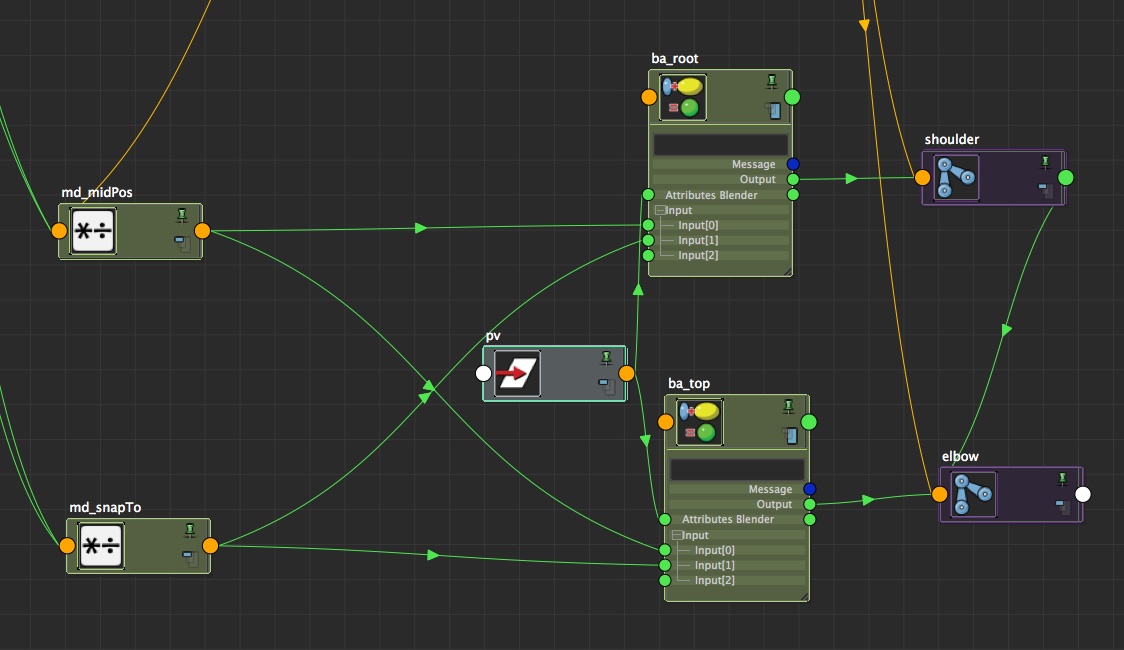
You now have your attribute snapToPv fully functionnal, which will be stay up to date regarding your pole vector position (as you parented the locator used in the ratio calculation (loc_distMid)).
Conclusion
With this system, you have a stretch a little bit more interesting than the basic stretch. Of course, you still need to connect everything else to the character, clean your outliner, connect the distances to the global scale, etc. You can find a script doing all of that automatically in the Download section (by 'that', i mean what we saw here, not connecting the system to your character =), if you want, as well as the scene used in this example. Once again, this article is not meant to be a super reference for the stretch, the goal is to help you manipulating nodes to reach your goals, even if it's for a different puropose than what we saw here! I hope you enjoyed and start liking the node-base concept of maya!