Table of Contents
Introduction
This tutorial is meant for super beginners and was initially used by my first year students. Feel free to take whatever you think is useful from it, but don't expect too much if you're already comfortable in rigging. We're gonna create a super simple ik spline setup, with 2 controls and an advanced twist control setup.
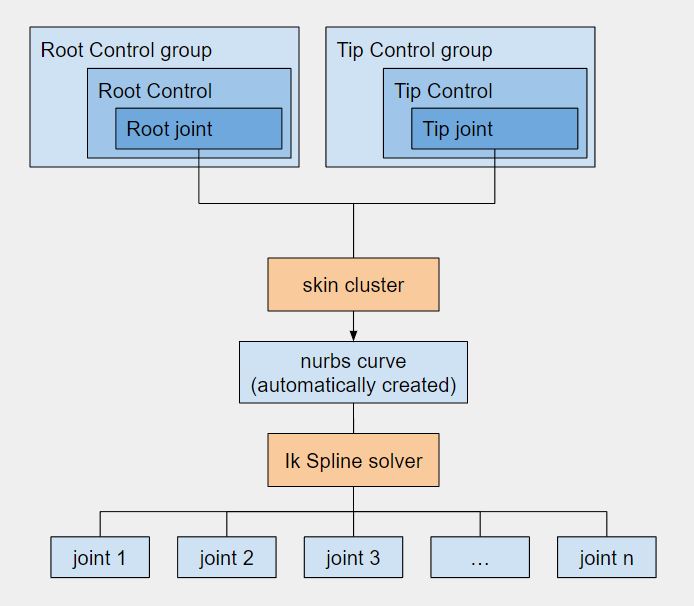
In a nutshell, this is how your setup will look like
Create all the elements
First, we need to create all our elements. We're gonna need
- A chain of n joints
- Two Controllers (with one joint under each controller)

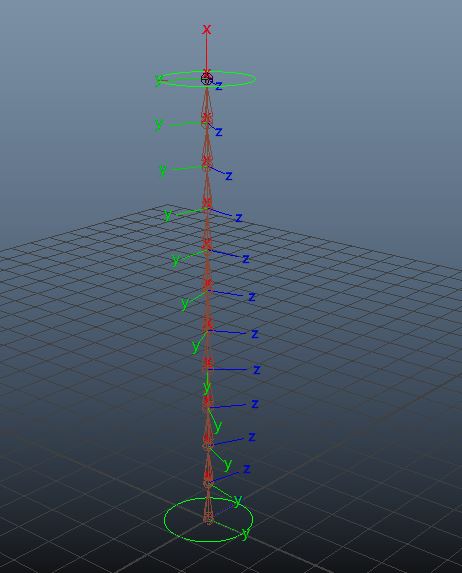
Then, let's create our joints. In my case, I've decided to create 12 joints, because why not. Let's rename them spine_## while we're at it

Connect everything together
We have our joint chain, we have our controls. Now let's go to our Skeleton menu, look for Create IK Spline Handle and open its options. For us at this point, the most important part is the "Auto Create Curve" as well at the Auto simply curve. The former will tell maya to automatically generate a nurbsCurve to drive our joints when we create or ik solver. The latter will specify how this auto-generated curve will look like, that is, how many segments we want.

It's now time to create our ik spline solver. With the Ik Spline Handle tool active, let's click on our first joint, then on our last joint. Remember to select your joints in the viewport, not in the outliner
Once created, you should see a "ikHandle1" node in your outliner along with a "curve1". If you're missing this curve1, you wanna double check you do have "Auto Create Curve" checked in your ik spline handle tool. Note that your ikHandle1 node can be parented anywhere you'd like, as it won't have any impact over your ik spline behavior itself.
Now we have all your elements, let's make sure our curve will follow our controls. Reminder, if you refer to the very first diagram, we now have a curve driving our joint chain (you can move the curve and see it does drive the joints - don't remember to undo to get back to the original position!), but we're still missing the skinCluster between our controls and our curve. Let's add it; select the root and tip joint, the curve, then Skin/Bind Skin (Make sure to bind to "selected joints"). Now the controls are driving the curve, and the curve is driving the joint chain

Dealing with the joint orientation
The last and most interesting part in our setup is to make sure we can rotate the joints when rotating the controllers. In our case, we want a progressive blending between the first joint and the last joint, i.e. the first joint should follow exactly the root control orientation, the last joint should follow exactly the tip control orientation, with blends (or "slerp") for the in-between joints. Luckily, Maya got us covered and we won't have to deal with the math behind it. We're gonna use a feature called "Advanced Twist Control", exposed via our ikHandle node.
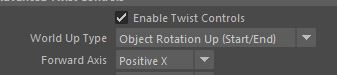
With your ikHandle node selected, go to the Attribute Editor and navigate to IK Solver Attributes/Advanced Twist Control. In here, start by checking the "Enable Twist Controls"
We're not gonna cover all the options exposed here, hopefully if you grasp the meaning of the one we'll use, the rest will make total sense.
Aim axis
First things first, let's figure the aim axis. Usually, and unless you're told otherwise, you'll have the X axis of your joint pointing towards its first child. In the ik spline setup, that's the "Forward Axis". You can leave it to "Positive X". Agains, that means the x axis of each joint will point towards its child.
Up Axis
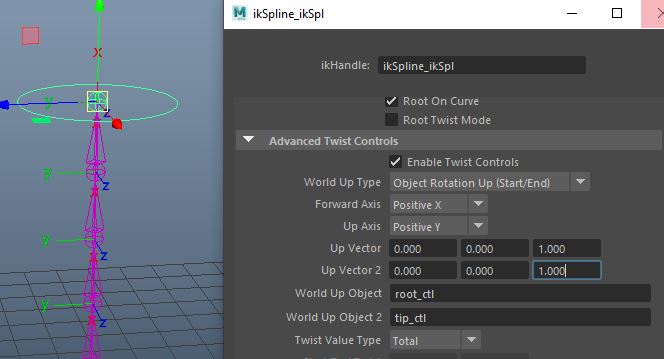
Now with the Up Axis, it's a bit trickier. I decided to use "Positive Y" as my up axis. That means I'm trying to have the Y of my joints pointing to a specific direction. It is now up to me to define this specific direction. I could use an arbitrary vector in my scene, but what we usually do to have a robust setup is that we use the rotation of our root/tip controllers. So the first thing we want to do is to declare that we want to use our controllers to drive the Up axis of our joints. Let's set our World Up Type to Object Rotation Up (start/end). Maya nows know we're gonna use some objects to drive our joints up vector. Which objects? Let's tell maya! Under World Up Object and World Up Object 2, we'll put respectively our root control (in my scene, "root_ctl"), and our tip control, "tip_ctl" for me. From now on, Maya will use an axis of those controls to align my joints on. All we need to do now is to define which axis of my controller will drive the up of my joint (remember, we decided that our up axis for the joints would be Positive Y). You might want to read this sentence again and again until it makes sense!
So if I want +Z of my control to drive +Y of my joints, that will translate into maya to:
- Up Vector: [0, 0, 1] (Remember, +Z, in vector form, translate to 0, 0, 1)
- Up Axis: Positive Y
If I want +X of my control to drive -Z of my joints (-Z being the opposite direction of Z), that will translate into maya to:
- Up Vector: [1, 0, 0]
- Up Axis: Negative Z

And so on... Now, when you rotate one of the controllers, your joints will blend between your 2 controls